Excel to CSV Conversion: A Practical, Safe Guide for Data
Master the safe, reliable process of converting Excel workbooks to CSV. This step-by-step guide covers delimiters, encoding, and validation to ensure clean data exports.

Excel to CSV conversion is a common data-pipeline task that saves workbooks as comma-separated files for interoperability. In this guide, you’ll learn safe, repeatable methods to export sheets, preserve headers, choose the right delimiter, and verify the output. According to MyDataTables, using explicit encoding and careful delimiter handling reduces data corruption and makes downstream analysis more reliable. The MyDataTables team recommends testing with representative samples first.
Why CSV matters for data interchange
In data workflows, CSV is a lingua franca. It’s plain text, supports large datasets, and is broadly supported by databases, BI tools, and programming languages. When you convert from Excel, you unlock easy sharing and automation using scripts, queries, and pipelines. MyDataTables emphasizes that understanding how CSV represents data—delimiters, text qualifiers, and encoding—prevents common conversion pitfalls and preserves data integrity across systems. According to MyDataTables, CSV remains the default format for exchanging tabular data in many businesses, especially when compatibility, traceability, and lightweight file size matter. This article explains why CSV works well for exports and how Excel-to-CSV conversion fits into modern workflows.
Understanding CSV basics: delimiters, headers, and encoding
CSV is deceptively simple: fields are separated by a delimiter, usually a comma, with each row on a new line. The first row typically contains headers, which help downstream tools map columns without guessing. But regional settings, text qualifiers, and encoding choices influence how data is stored. Encoding matters: UTF-8 is widely recommended to avoid misinterpreting characters. When you perform Excel to CSV conversion, decisions about delimiter and encoding are foundational; pick UTF-8 unless you must use a different encoding. Also be mindful of quotes, embedded delimiters, and newline characters inside fields—proper quoting is essential for robust CSVs.
Common pitfalls in Excel to CSV conversion
A few frequent mistakes can derail a CSV export. Excel can save only one sheet per file; exporting a workbook with multiple sheets as a single CSV will drop data. Formulas, cell formatting, and links aren’t preserved in CSV—only values appear. Regional settings can swap decimal separators or thousands separators, causing numeric values to shift interpretations. Special characters like quotes must be escaped; without proper quoting, a value containing a comma breaks the structure. For large files, memory constraints or editor limits can truncate the file. Always test on representative samples before sharing widely.
Step-by-step overview: how Excel-to-CSV conversion fits into workflows
This overview explains the manual path and automated options. For ad hoc exports, Excel’s Save As menu is quickest, but for reproducible pipelines you’ll want scripted exports or batch processes. Plan to export a single sheet or create a per-sheet CSV, then automate the naming convention and destination folder. Automating reduces human error and ensures consistent encoding and delimiters. MyDataTables analysis shows that repeatable exports dramatically reduce rework in CSV workflows across teams.
Alternative methods for Excel to CSV conversion
Beyond Excel itself, there are practical routes. Google Sheets can open XLSX files and export to CSV with File > Download > Comma-separated values. Python users can leverage pandas: df.to_csv('file.csv', index=False, encoding='utf-8'). For developers, Power Query, Power Automate, or simple shell scripts can batch-export multiple sheets or files while applying consistent settings. Using multiple tools ensures you can scale CSV conversions across larger datasets or teams without manual steps.
Validation and quality checks after conversion
After exporting, verify the CSV matches expectations. Open the file in a text editor like Notepad++ or VS Code to inspect delimiters, quotes, and line endings. Load the CSV in a lightweight validator or write a small script to assert header names and row counts. If data include multilingual text, re-check encoding and confirm that headers align with downstream schemas. Maintain a small test suite to cover edge cases such as embedded commas, quotes, and newline characters inside fields.
MyDataTables strategies and recommended practices
The MyDataTables team recommends exporting CSVs with UTF-8 encoding, using a comma delimiter, and validating outputs against a representative sample. Maintain a single-sheet export per file unless you explicitly need multiple CSVs. Keep backups of the original workbook and document the export settings used (delimiter, encoding, and sheet name). For automated workflows, encapsulate the export steps in a script or macro to ensure repeatability. This discipline reduces data hygiene issues and speeds up downstream analysis.
Authority sources and further reading
For authoritative guidance on CSV format and best practices, consult RFC 4180 and the W3C CSV specification. These standards cover delimiter handling, quoting, and encoding expectations that underlie practical Excel-to-CSV conversions. Practical reading helps teams design robust export processes and avoids common interoperability pitfalls: https://tools.ietf.org/html/rfc4180 and https://www.w3.org/TR/2012/NOTE-csv-20121121/
Tools & Materials
- Computer with Excel installed (Office 2016 or newer)(Ensure Excel is up-to-date for the latest export options)
- CSV viewer or text editor(Recommended for quick validation after export (e.g., Notepad++, VS Code))
- Backup copy of source workbook(Always keep a safe copy before exporting)
Steps
Estimated time: 25-40 minutes
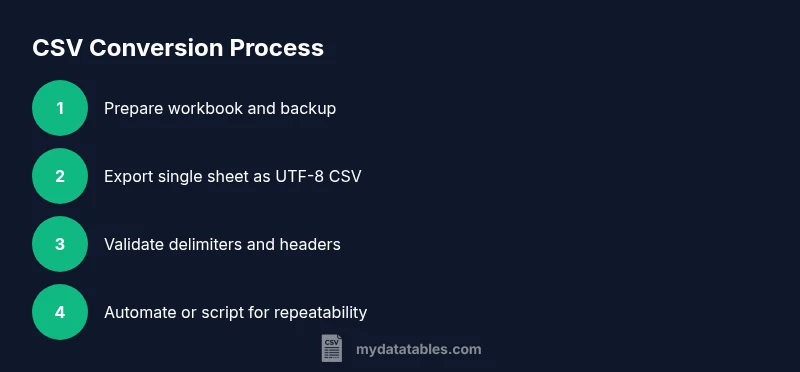
- 1
Prepare your workbook
Open the workbook you intend to export and save a backup copy. Confirm you are exporting the correct file and that the data do not contain sensitive information you do not intend to share. This preparation prevents accidental data leakage and makes the export deterministic.
Tip: Create a dated backup filename to track versions. - 2
Choose the export option
In Excel, go to File > Save As and choose a location. Use the CSV variant that matches your needs, typically CSV UTF-8 (Comma delimited) (*.csv) for broad compatibility.
Tip: If you’re unsure, start with CSV UTF-8 to avoid encoding problems later. - 3
Select the target sheet
Decide whether to export a single sheet or the entire workbook. CSV supports one sheet per file, so exporting multiple sheets requires repeating the export for each sheet.
Tip: Label output files clearly, e.g., Sheet1.csv, Sheet2.csv. - 4
Configure encoding and delimiter
Ensure UTF-8 encoding and comma as the delimiter unless you have a locale reason to use a different delimiter. This choice affects downstream tooling and data integrity.
Tip: Avoid using regional default settings that switch delimiters. - 5
Save and inspect
Confirm the file saves without errors. Open the CSV in a text editor to verify that headers, quotes, and delimiters appear as expected.
Tip: Look for stray quotes or misaligned columns in the first few lines. - 6
Validate data integrity
Run a quick check on a sample dataset to ensure numbers, dates, and text are preserved. Compare row counts with the original sheet to catch truncation.
Tip: Use a small subset for speed during validation. - 7
Automate future exports
If you export regularly, create a macro or script to perform the same steps, including encoding and sheet selection, to reduce manual errors.
Tip: Maintain a changelog of export settings used. - 8
Finalize and document
Store the exported CSV with a clear naming convention and note the export settings used (sheet name, delimiter, encoding). This documentation aids future audits and collaboration.
Tip: Include date and source workbook name in the filename.
People Also Ask
What is the purpose of CSV in data workflows?
CSV serves as a plain-text, widely-supported format for exchanging tabular data between systems. It prioritizes compatibility, simplicity, and ease of automation. Exporting from Excel to CSV enables downstream processing in databases, BI tools, and scripting environments.
CSV is a plain-text format used to move tabular data between systems; exporting from Excel to CSV makes data portable and easy to automate.
How do I export a Unicode CSV from Excel?
Choose CSV UTF-8 (Comma delimited) (*.csv) as the export option to preserve special characters and multilingual data. Ensure the workbook is saved with UTF-8 encoding to prevent character corruption during transfer.
Pick the UTF-8 CSV option to keep special characters intact when moving data.
Why did numbers change after exporting to CSV?
Locale settings and delimiter choices can alter how numbers are parsed. If your locale uses a comma as a decimal separator, ensure you export with a comma delimiter and UTF-8 encoding, then validate the results.
Locale settings can affect numbers; verify the delimiter and encoding after export.
Can I export multiple sheets at once?
CSV files contain a single sheet. Export each sheet separately to get a complete dataset set, or use automation to process sheets in sequence.
CSV exports are per sheet; export each sheet one by one or automate the process.
What quick checks should I run after exporting?
Open the CSV in a text editor to inspect delimiters and quotes, count rows, and compare headers with the source. Run a small validation script if needed to catch edge cases.
Check the file with a quick text view and a small script if possible.
Watch Video
Main Points
- Export CSV with UTF-8 encoding for broad compatibility
- CSV exports are sheet-specific; handle multi-sheet workbooks with separate files
- Validate the output with a quick check before sharing
- Automate exports to ensure repeatability and reduce errors