How to Import a CSV File to SQL Server
Learn practical steps to import a CSV file into SQL Server. This guide covers prep, method selection, data-type mapping, validation, and troubleshooting for reliable data ingestion.

Importing a CSV file to SQL Server is a common, repeatable task that can be completed with built‑in tools like the SQL Server Import and Export Wizard, BULK INSERT, or SSIS. This quick answer outlines prerequisites, data-type mapping, and validation steps to ensure a reliable ingestion process, plus guidance on choosing the right method for your data size and schema.
Why importing a CSV file to SQL Server matters
In data workflows across teams and departments, CSV files are a staple for sharing tabular data. Importing them into SQL Server centralizes data validation, indexing, and downstream analytics. A well-executed import enables fast queries, consistent reporting, and easier governance. According to MyDataTables, most data teams start with a straightforward CSV import to validate shape and content before scaling to automation or incremental loads. This foundation reduces surprises later in the data pipeline and helps you build reproducible processes for colleagues and stakeholders.
Understanding CSV formatting and SQL Server schema mapping
CSV is a simple, flexible format, but compatibility with SQL Server hinges on a few details. First, confirm the delimiter (comma, semicolon, tab, or other) and whether the CSV has a header row. Next, verify encoding (UTF-8 is common, but some sources use UTF-16 or ANSI). Handling quotes and embedded newlines also matters, especially if fields contain commas or line breaks. Finally, map each CSV column to a corresponding SQL Server column, choosing appropriate data types (for example, integers for counts, date types for dates, and varchar for free text). A mismatch between CSV values and destination types is a frequent source of failed imports or rejected rows. The MyDataTables approach emphasizes explicit column mapping and pre-mapped schemas to minimize surprises during load.
Preparation steps before importing
Preparation is the backbone of a successful import. Start by inspecting the CSV for malformed rows, missing values, and inconsistent column counts. Create or prepare a target table with a schema that aligns with the data, including primary keys, constraints, and appropriate nullability. Decide on error handling behavior: should bad rows be redirected to an error file, or should the import stop on first error? Ensure you have access to the SQL Server instance and sufficient permissions to create or alter objects. Having a test database or a staging schema helps to validate the import without impacting production data. Document the mapping decisions so teammates reproduce the process later.
Import methods overview: which path to choose
SQL Server offers several ways to bring CSV data into a table. The Import and Export Wizard provides a guided, user-friendly experience for smaller jobs. BULK INSERT is a fast, script-based option ideal for large datasets, especially when you know exact formats. OPENROWSET enables ad-hoc queries from CSV files, useful for quick checks or demonstrations. SSIS (SQL Server Integration Services) delivers a robust, repeatable integration framework with error handling, logging, and complex transformations. Each method has trade-offs in speed, control, and maintainability; your choice should reflect data size, the need for ongoing automation, and the desired level of auditing.
Step-by-step overview for a reliable import
Start with a clean blueprint: a tested schema, a sample file, and a minimal package or script. Validate the structure with a small subset of rows to confirm column alignment and data types. Use explicit column lists in your statements to prevent misalignment if the file column order changes. Consider staging the load in a dedicated schema to isolate validation checks from production tables. Track the import with a simple log (rows loaded, errors found, time stamps) to support troubleshooting and future audits.
Validation, data quality, and error handling
After import, verify row counts, check for nulls in non-nullable columns, and run spot checks on sample rows to confirm values were parsed correctly. If errors are reported, inspect the offending rows, fix the CSV (or adjust the schema) and retry. Establish a repeatable process: run a test import with a known-good sample, then execute a production load with the full dataset. Consistent validation rules, clear error messages, and reproducible scripts help teams scale CSV ingestion without sacrificing data quality.
Performance considerations and best practices
For larger CSV files, batch the load and use transactions to ensure atomicity. Disable nonessential constraints or indexes during the import, then rebuild them afterward to speed up loading. Use proper batch sizes and parallelism where supported, and consider compressing the source file if moving it over the network. Always test performance in a staging environment to avoid surprises in production. These practices reduce downtime and help maintain stable query performance after the import.
Real-world example: from CSV to a production table with validation
Let’s assume a CSV with columns: id, name, signup_date, total_spend. You would create a target table with corresponding types, use a controlled import method, and validate a sample of rows against known business rules (e.g., signup_date is not in the future, total_spend is non-negative). If the file is large, you may ingest in chunks, validate each chunk, and append to the target table. This approach minimizes downtime and provides clear checkpoints for QA and stakeholders.
Troubleshooting common issues and how to avoid them
Many import problems stem from subtle encoding mismatches, delimiter misinterpretation, or missing columns. Always start by validating the file with a simple reader tool or a quick SQL check. If a load fails, review the error messages, verify the column mapping, and confirm the destination schema. For non-deterministic data (for example, dates from different locales), consider normalizing values prior to import. Establish a repeatable, script-driven workflow so future CSV loads are predictable and auditable.
Putting it all together: a repeatable workflow you can reuse
By documenting the file layout, creating a stable destination schema, choosing the right import method, and building in validation steps, you can transform ad-hoc CSV loads into reliable data pipelines. A well-documented process reduces risk, accelerates onboarding, and makes it easier to automate future imports. As you grow, you can add scheduling, error alerts, and integration with your data catalog, all while maintaining data quality and governance.
Tools & Materials
- SQL Server instance (on-premises or cloud)(Ensure you have credentials with sufficient privileges to create/alter tables and run imports.)
- SQL Server Management Studio (SSMS) or Azure Data Studio(Used to run queries, manage schemas, and monitor imports.)
- CSV file to import(UTF-8 encoding preferred; ensure a representative sample is available for testing.)
- Target database and destination table(Create a schema that matches the CSV structure before import.)
- Data type mapping plan(Document how each CSV column maps to SQL Server types (INT, VARCHAR, DATE, etc.).)
- Optional: staging schema or table(Use for validation before final load into production.)
- Text editor or small validator script(Useful for inspecting and correcting header mismatches or special characters.)
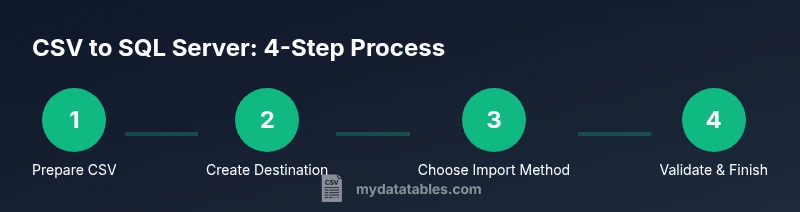
Steps
Estimated time: 60-180 minutes
- 1
Prepare environment and file
Verify access to the SQL Server instance and review the CSV formatting (delimiter, encoding, header presence). Create a staging table that mirrors the target schema to minimize risk during import.
Tip: Keep a copy of the original CSV untouched for re-imports; use a sample for initial testing. - 2
Define destination schema
Create or adjust the target table to match the CSV columns and inferred data types. Include constraints where appropriate to preserve data quality, such as NOT NULL for essential fields.
Tip: Use explicit column lists in your import to avoid column-order issues if the CSV changes. - 3
Choose an import method
Decide between Import and Export Wizard, BULK INSERT, OPENROWSET, or SSIS based on file size, transformation needs, and repeatability.
Tip: For one-off imports, the Wizard is quick; for large, repeatable loads, SSIS or BULK INSERT may be better. - 4
Run a small test import
Load a subset of rows to verify mappings, data types, and error handling before processing the full file.
Tip: Check error output and adjust mappings if rows fail to insert. - 5
Execute full import
Perform the complete load, using transactions if supported to ensure atomicity. Validate post-load results against expectations.
Tip: Wrap the load in a transaction and commit only after successful validation. - 6
Validate and clean up
Run quality checks on a sample of rows, ensure constraints are satisfied, and remove or quarantine any problematic records.
Tip: Document any anomalies and adjust future CSV preprocessing steps to reduce recurring issues.
People Also Ask
What is the simplest way to import a small CSV into SQL Server?
For small files, use the SQL Server Import and Export Wizard via SSMS. It guides you through source selection, destination mapping, and data type handling with a preview of results.
For small CSV files, start with the Import and Export Wizard in SSMS. It guides you through mapping and previewing results.
How do I handle different encodings in CSV files?
Verify the CSV encoding (UTF-8 is common). If characters appear garbled, convert to UTF-8 without BOM or adjust the import statement to specify the encoding.
Check the CSV encoding and convert to UTF-8 if necessary before importing.
Which import method is fastest for large CSV files?
BULK INSERT is generally fastest for large, simple loads, while SSIS offers more control and error handling for complex transformations.
For big files, BULK INSERT is usually fastest, but SSIS gives you more control if you need transformations.
Can I import without a header row in the CSV?
Yes, but you must explicitly define the column order in your import command and ensure the data aligns with the target schema.
Yes, but you must map columns by position because there is no header.
How can I automate CSV imports regularly?
Use an SSIS package or a scheduled job that runs BULK INSERT with a controlled file path and logging, so you have repeatable, auditable imports.
Automate with an SSIS package or scheduled BULK INSERT job with logging.
What should I do if import fails on one row?
Check the error messages, isolate the problematic row, fix the data (or adjust schema), and re-run the load on the remainder or the corrected file.
Isolate the bad row, fix data, and re-run the load for the rest.
Watch Video
Main Points
- Plan the schema before importing.
- Choose an import method that fits data size and repeatability.
- Validate data and mappings with a test load.
- Use transactions to ensure safe, atomic imports.
- Document the process for repeatable, auditable loads.